
Welcome to our comprehensive guide on moisture barriers, a critical yet often overlooked component in home construction. This blog is designed to shed light on what moisture barriers are, their vital role in protecting homes from moisture-related damage, and the various types available for different construction needs. Understanding moisture barriers is key to ensuring the longevity and integrity of your home.
Moisture barriers are materials or systems used in building construction to prevent water or vapor from penetrating and damaging the structure of a home. They are essential in safeguarding against the detrimental effects of moisture, such as mold growth, wood rot, and general deterioration of building materials. These barriers are particularly crucial in areas prone to high humidity or where direct contact with water is a possibility.
In this discussion, we will delve into the different types of moisture barriers, each designed to address specific moisture challenges in various parts of a home. From vapor barriers that prevent condensation within walls to waterproof membranes used in basements and roofs, we will explore how these barriers work and where they are most effectively applied.
Join us as we navigate the world of moisture barriers, offering insights into how they function, their importance in home construction, and guidance on selecting the right type for your building needs. Whether you're a homeowner, a builder, or simply interested in home construction, understanding moisture barriers is a step towards ensuring a durable and healthy living space.
Understanding the Need for Moisture Barriers
Moisture barriers are an essential aspect of home construction and maintenance, playing a crucial role in protecting the structural integrity and indoor air quality of your home. Understanding how moisture affects various parts of your home and identifying the areas that require moisture barriers are key steps in ensuring long-term durability and comfort. This section will delve into the impact of moisture on homes and highlight the critical areas where moisture barriers are necessary.
How Moisture Affects Your Home
The Impact of Moisture on Building Materials and Indoor Air Quality
Moisture can have a profound impact on building materials. Prolonged exposure to moisture can lead to:
- Wood Rot and Structural Damage: Wood, a common building material, is particularly susceptible to rot when exposed to moisture over time. This can compromise the structural integrity of your home.
- Mold and Mildew Growth: Excess moisture creates an ideal environment for mold and mildew, which can cause health issues and degrade indoor air quality.
- Corrosion and Deterioration: Moisture can also lead to the corrosion of metal components and the deterioration of other building materials, reducing their lifespan and effectiveness.
Common Problems Caused by Excess Moisture
Excess moisture in homes can lead to a variety of problems, including:
- Peeling Paint and Wallpaper: High humidity levels can cause paint and wallpaper to peel, leading to aesthetic and structural issues.
- Condensation on Windows and Walls: This can result in water damage and contribute to mold growth.
- Unpleasant Odors: Excess moisture often causes musty odors, making the indoor environment uncomfortable.
Identifying Areas that Require Moisture Barriers
Basements, Crawl Spaces, and Walls
Certain areas of your home are more prone to moisture problems and require special attention:
- Basements and Crawl Spaces: These areas are in direct contact with the ground and can be susceptible to moisture from soil and groundwater.
- Walls: Walls, especially exterior walls, need moisture barriers to prevent water intrusion from the outside and to manage condensation within the wall assembly.
Considerations for Different Climates and Building Designs
- Climate Considerations: The need for and type of moisture barrier can vary significantly depending on your local climate. In humid climates, for example, vapor barriers might be necessary to prevent indoor condensation.
- Building Design: The design of your home, including its foundation type, wall construction, and overall architecture, will influence the type and placement of moisture barriers.
Types of Moisture Barriers
Moisture barriers are a critical component in protecting homes from the damaging effects of moisture. Understanding the different types of moisture barriers and their specific uses is essential for ensuring the right protection for various parts of a home. This section will explore the distinctions between vapor barriers and vapor diffusion retarders, as well as delve into the various materials used for moisture barriers, discussing their advantages and disadvantages.
Vapor Barriers vs. Vapor Diffusion Retarders
Definitions and Differences
- Vapor Barriers: Vapor barriers are materials that prevent the passage of water vapor through walls, ceilings, and floors. They are typically impermeable or have a very low permeability. Vapor barriers are used to prevent moisture from condensing within the building envelope, which can lead to mold growth and structural damage.
- Vapor Diffusion Retarders: Vapor diffusion retarders, while similar to vapor barriers, offer a more moderate approach to moisture control. They slow down but do not completely stop the passage of water vapor. These are used in situations where some moisture transfer is needed to prevent the building envelope from becoming too dry or too moist.
Appropriate Usage Scenarios for Each Type
- Vapor Barriers: Ideal for use in very cold climates where the interior of the building is significantly warmer and more humid than the outside. They are typically installed on the warm side of the insulation in a building envelope.
- Vapor Diffusion Retarders: More suitable for mixed or moderate climates where the difference in temperature and humidity between the inside and outside of the building is less extreme. They help in managing moisture levels without completely blocking moisture transfer.
Materials Used for Moisture Barriers
Polyethylene Sheeting, Foil-Backed Paper, Foam Board Insulation
- Polyethylene Sheeting: A common and cost-effective moisture barrier. It is impermeable and effective in preventing moisture penetration. However, it must be installed carefully to avoid tears and gaps.
- Foil-Backed Paper: Often used in roofing, foil-backed paper serves as a moisture barrier and can also reflect heat. It's lightweight and easy to install but can be more susceptible to damage during installation.
- Foam Board Insulation: This material not only provides insulation but also acts as a moisture barrier. It is effective in preventing moisture transmission and adds to the thermal resistance of a building. However, it is more expensive than other options and requires careful installation to ensure complete coverage.
Pros and Cons of Different Materials
Each material has its advantages and disadvantages:
- Polyethylene Sheeting: Inexpensive and effective, but can be prone to damage if not installed correctly.
- Foil-Backed Paper: Offers additional heat reflection, but less durable than other options.
- Foam Board Insulation: Provides excellent insulation and moisture protection but at a higher cost and requires precise installation.
Preparing for Moisture Barrier Installation
Installing a moisture barrier is a crucial step in protecting your home from the damaging effects of moisture. Whether you're tackling a DIY project or preparing for professional installation, understanding the necessary tools, materials, and preparatory steps is essential. This section will guide you through the preparation process for moisture barrier installation, ensuring you're equipped for a successful and safe installation.
Tools and Materials Needed
List of Necessary Tools and Materials for DIY Installation
For a typical DIY moisture barrier installation, you will need:
- Moisture Barrier Material: Such as polyethylene sheeting, foil-backed paper, or foam board insulation.
- Utility Knife: For cutting the moisture barrier material to size.
- Staple Gun or Tape: Depending on the material, you may need a staple gun for securing it in place or special tape for sealing joints.
- Measuring Tape: To accurately measure the area where the moisture barrier will be installed.
- Caulking Gun and Sealant: For sealing any gaps or openings.
Safety Equipment and Precautions
Safety is paramount during installation:
- Protective Gear: Wear gloves, safety glasses, and a dust mask, especially if working in areas with insulation or in confined spaces.
- Ladder Safety: If working at height, use a sturdy ladder and follow safety guidelines to prevent falls.
- Awareness of Electrical Wiring and Plumbing: Be cautious of electrical wiring and plumbing in walls to avoid accidents.
Preparing the Installation Area
Cleaning and Drying the Area
Before installing a moisture barrier:
- Clean the Area: Ensure the area is free from dust, debris, and any materials that might puncture the moisture barrier.
- Dry the Area: The installation area should be completely dry. If there's any sign of moisture, identify the source and rectify it before proceeding.
Repairing Any Existing Damage or Leaks
- Inspect for Damage: Check for any signs of existing damage, such as rot or mold, in the installation area. These issues should be addressed before installing the moisture barrier.
- Repair Leaks: If there are any leaks, repair them prior to installation. This might involve patching holes, sealing gaps, or fixing plumbing issues.
Step-by-Step Guide to Installing Moisture Barriers
Installing moisture barriers is a critical step in protecting your home from the damaging effects of excess moisture. Whether you're dealing with crawl spaces, walls, or ceilings, proper installation is key to ensuring these barriers function effectively. This section provides a step-by-step guide to installing moisture barriers in different areas of your home, ensuring you have the knowledge to tackle this important task.
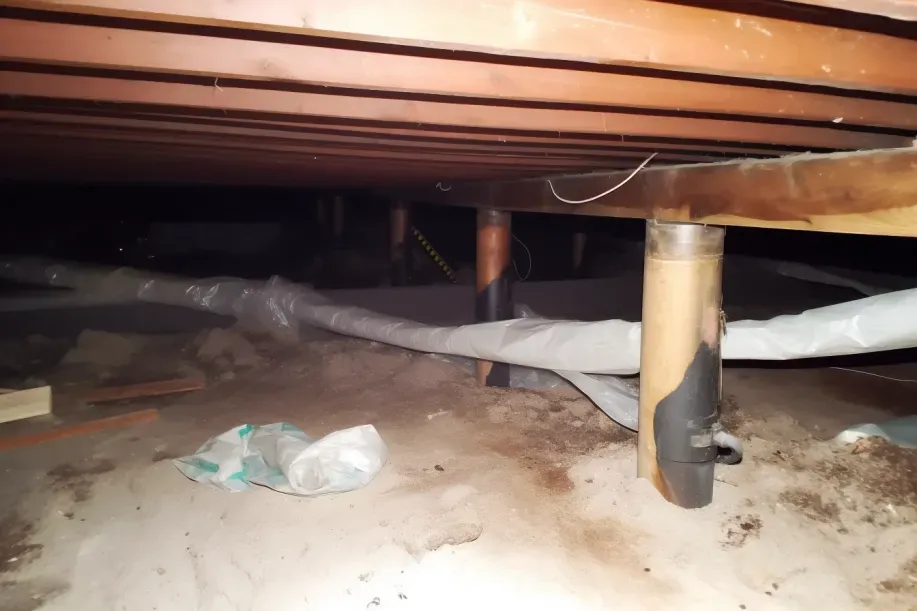
Installation in Crawl Spaces
Laying Down the Barrier on the Crawl Space Floor
Measure and Cut the Material: Measure the crawl space and cut your moisture barrier material (such as polyethylene sheeting) to fit. Allow for some overlap at the seams.
Lay the Barrier: Start at one end of the crawl space and unroll the barrier, covering the entire floor. For large areas, you may need to use multiple sheets.
Overlap Seams: Overlap the edges of different sheets by at least 6-12 inches to ensure complete coverage.
Securing and Sealing the Barrier to Foundation Walls
Extend the Material Up the Walls: The barrier should extend several inches up the foundation walls. This helps to create a continuous moisture barrier.
Secure the Barrier: Use a staple gun or construction tape to secure the barrier to the walls. Be careful not to puncture the material.
Seal the Seams: Use a moisture-resistant tape to seal all seams, both where different sheets overlap and where the sheeting meets the foundation walls.
Installation in Walls and Ceilings
Cutting and Fitting the Barrier Around Obstacles
Measure and Mark the Material: Hold the moisture barrier material against the wall or ceiling and mark areas where it needs to be cut to fit around obstacles like electrical boxes or vents.
Cut the Material: Use a utility knife to carefully cut the material at the marked spots.
Techniques for Ensuring Airtight Seals
Overlap at Seams: When applying the barrier to walls or ceilings, ensure that each piece overlaps at the seams by at least 6 inches.
Seal Around Obstacles: Use moisture-resistant tape or caulk to seal the barrier around any obstacles or penetrations to maintain an airtight seal.
Smooth Out Air Bubbles: After applying the barrier, smooth out any air bubbles or wrinkles to ensure a tight fit.
Moisture Barrier Maintenance and Troubleshooting
Maintaining the effectiveness of moisture barriers is crucial for the long-term protection of your home against moisture-related issues. Regular inspections and timely troubleshooting are key to ensuring these barriers continue to function as intended. This section will guide you through the process of inspecting and maintaining moisture barriers, identifying common issues, and implementing effective solutions.
Regular Inspections and Maintenance
How to Inspect and Maintain Moisture Barriers
Visual Inspection: Periodically inspect your moisture barriers for any signs of damage or wear. This includes checking for tears, holes, or areas where the barrier may have come loose.
Check for Proper Sealing: Ensure that all seams and junctions are properly sealed. Over time, tape or sealant used on moisture barriers can deteriorate, requiring reapplication.
Look for Moisture Accumulation: Check for any signs of moisture accumulation or condensation, particularly in areas where the barrier interfaces with other building materials.
Signs of Wear or Damage to Look For
- Physical Damage: Tears, holes, or punctures in the barrier material.
- Discoloration or Mold: Signs of mold growth or discoloration can indicate moisture penetration.
- Peeling or Detaching: Areas where the barrier is coming loose from its attachment points.
Common Issues and Solutions
Addressing Condensation, Tears, or Gaps
- Condensation: If condensation is observed, it may indicate inadequate ventilation. Improving air circulation in the area can help reduce moisture levels.
- Tears or Holes: Small tears or holes can often be repaired with moisture-resistant tape. Ensure the area is dry before applying the tape.
- Gaps: Reapply sealant or tape at seams or junctions where gaps have appeared.
When to Replace or Repair Moisture Barriers
- Extensive Damage: If a moisture barrier shows extensive damage or deterioration, it may be more effective to replace it entirely rather than attempting repairs.
- Persistent Moisture Issues: If moisture problems persist despite repairs, it may indicate that the barrier is no longer effective and needs replacement.
- Upgrading: Consider upgrading to a more advanced moisture barrier material if your current barrier is outdated or not performing adequately for your home’s needs.
As we conclude our exploration of moisture barriers in home construction, it's essential to underscore their critical role in safeguarding the integrity and health of your living space. Moisture barriers are not just a construction detail; they are a fundamental component in ensuring the longevity and comfort of your home. This recap will highlight the significance of moisture barriers and encourage homeowners to take proactive measures for effective moisture management.
The Vital Role of Moisture Barriers:
- Moisture barriers serve several key functions in home construction:
- Protecting Structural Integrity: By preventing moisture ingress, these barriers help protect the structural components of your home from water damage, rot, and corrosion.
- Preventing Mold and Mildew: Moisture barriers are essential in preventing the growth of mold and mildew, which can have serious health implications and degrade indoor air quality.
- Enhancing Comfort and Energy Efficiency: Properly installed moisture barriers contribute to a more comfortable indoor environment by helping to regulate humidity levels. They also aid in energy efficiency by enhancing the effectiveness of insulation.
FAQs
Contact Crawl Logic Today!
Crawl Logic will do everything we can to ensure your experience with us is excellent.
Request A FREE Estimate
CHECKOUT RECENT POST

Schedule Your FREE Crawl Space Evaluation!
Did you know YOU DON'T HAVE TO BE HOME for us to provide you with your 100% FREE crawl space inspection and report?
CHOOSE THE BEST OPTION, CRAWL LOGIC!
Ready to Elevate Your Experience? Let's embark on a journey to success together! Our team is dedicated to delivering excellence and innovation tailored to your unique needs. Connect with us now to discover how our services can transform your vision into reality. Your next big leap starts here
Crawl Logic - Franklin Crawl Space Encapsulation and Repair
HOURS
Monday: 8:00AM - 5:00PM
Tuesday: 8:00AM - 5:00PM
Wednesday: 8:00AM - 5:00PM
Thursday: 8:00AM - 5:00PM
Friday: 8:00AM - 5:00PM
Saturday: 8:00AM - 5:00PM
Sunday: 8:00AM - 5:00PM
Copyright © 2020 Crawl Logic - Franklin Crawl Space Encapsulation and Repair