
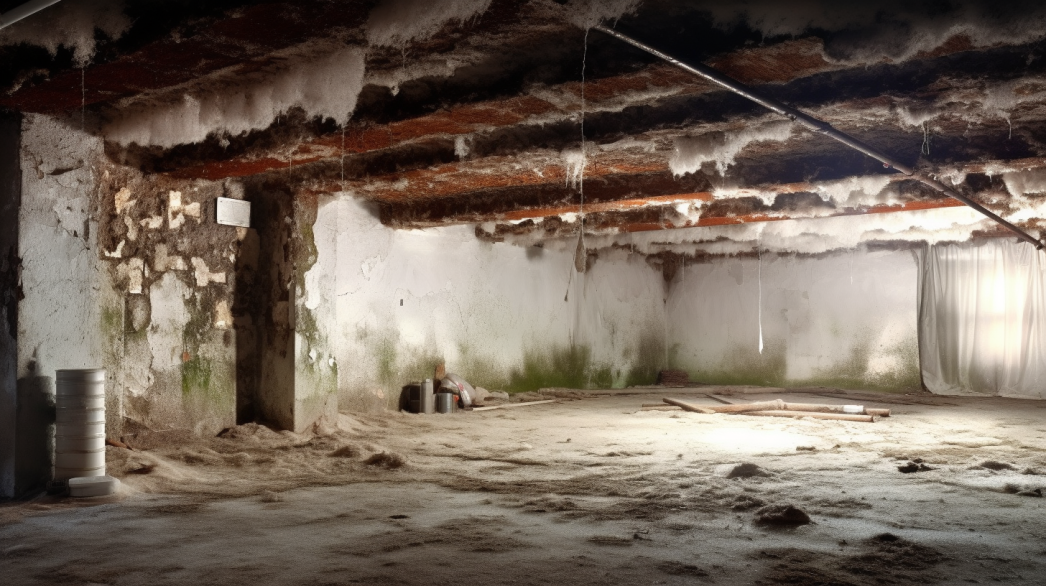
Maintaining your vapor barrier is crucial for ensuring the longevity and integrity of your bathroom structures. Vapor barriers play a vital role in controlling moisture levels within your home, particularly in high-humidity areas like bathrooms. They are designed to prevent water vapor from penetrating walls, floors, and ceilings, which can lead to a host of problems such as mold growth, structural damage, and decreased indoor air quality.
The effectiveness of a vapor barrier can diminish over time due to wear and tear, improper installation, or environmental factors. Regular maintenance and inspection of your vapor barrier are essential to ensure it continues to perform its protective function. By proactively maintaining your vapor barrier, you can prevent minor issues from developing into major problems that require costly repairs.
Maintaining a vapor barrier involves several key activities, including inspecting for signs of damage or deterioration, ensuring all seams and edges remain tightly sealed, and addressing any issues promptly. Additionally, maintaining proper ventilation in your bathroom is crucial to support the vapor barrier's function and reduce overall humidity levels.
Understanding the importance of maintaining your vapor barrier and implementing a routine maintenance plan will help safeguard your home against moisture-related issues. This proactive approach not only preserves the structural integrity of your bathroom but also contributes to a healthier living environment.
By prioritizing the upkeep of your vapor barrier, you can extend the life of your bathroom structures, prevent costly repairs, and maintain a safe and comfortable home. Regular maintenance is a small investment that pays off in long-term protection and peace of mind.
When to Repair or Replace Your Vapor Barrier
Assessing the Extent of Damage
Proper assessment of your vapor barrier is essential to determine whether a repair will suffice or if a full replacement is necessary. Here’s how to evaluate the condition of your vapor barrier:
Determining when a repair is sufficient:
- Minor Tears or Punctures: Small tears or punctures can often be repaired without replacing the entire vapor barrier. These minor damages typically occur during renovations or accidental impacts.
- Localized Damage: If the damage is confined to a small, specific area, repairing the affected section can effectively restore the barrier’s functionality.
Signs that indicate the need for replacement:
- Extensive Damage: Large areas of the vapor barrier that are torn, punctured, or worn out may not provide adequate moisture protection and will likely require replacement.
- Mold or Mildew: The presence of mold or mildew on or behind the vapor barrier indicates persistent moisture issues that might necessitate replacing the entire barrier.
- Age and Wear: Over time, vapor barriers can degrade due to environmental factors and normal wear and tear. If the barrier is old and shows signs of brittleness or significant wear, replacement is advisable.
Repair Techniques
When the damage to your vapor barrier is minor and localized, several repair techniques can effectively restore its integrity:
Using patches for minor repairs:
- Patch Materials: Use a piece of vapor barrier material that matches the existing barrier. Cut the patch to size, ensuring it overlaps the damaged area by at least two inches on all sides.
- Application: Secure the patch over the damaged area with high-quality waterproof tape. Press firmly to ensure a tight bond and seal the edges thoroughly to prevent moisture ingress.
Applying caulk or sealant for small gaps:
- Identify Gaps: Look for small gaps or holes in the vapor barrier, particularly around seams, edges, and penetrations such as pipes or fixtures.
- Caulking Process: Use a caulk gun to apply a bead of high-quality waterproof caulk or sealant to the gaps. Smooth the caulk with a caulking tool or your finger to ensure complete coverage and a tight seal.
Replacement Guidelines
In cases where the vapor barrier is extensively damaged or degraded, replacing it is the best option to ensure effective moisture protection. Follow these steps for a proper replacement:
Steps for removing the old vapor barrier:
- Preparation: Clear the area of any obstructions and ensure you have the necessary tools, such as a utility knife, pry bar, and protective gear.
- Removal: Carefully cut and remove the old vapor barrier material. Be mindful of not damaging the underlying structure. Dispose of the old material responsibly, especially if it has mold or mildew.
Installing a new vapor barrier:
- Measure and Cut: Measure the area to be covered and cut the new vapor barrier material to the appropriate size, allowing for overlaps at seams and edges.
- Installation: Attach the new vapor barrier starting from the top of the wall or ceiling. Use a staple gun to secure it in place, ensuring the material is taut and smooth.
- Sealing Seams and Edges: Overlap adjacent sheets by at least six inches and seal the seams with high-quality waterproof tape. Use caulk to seal around edges, windows, doors, and any other penetrations to create a continuous moisture barrier.
By carefully assessing the extent of damage and choosing the appropriate repair or replacement method, you can maintain the effectiveness of your vapor barrier and protect your bathroom structures from moisture-related issues. Regular inspection and timely maintenance are key to ensuring long-term durability and performance.
Routine Maintenance Tasks
Visual Inspections
Regular visual inspections are a critical part of maintaining the integrity of your vapor barrier. By routinely checking for visible signs of damage or wear, you can identify potential issues early and address them before they become significant problems.
Checking for visible signs of damage or wear:
- Tears and Punctures: Look for any tears, punctures, or holes in the vapor barrier material. These can be caused by accidental impacts, pests, or natural wear and tear over time.
- Seams and Edges: Pay close attention to seams and edges where the vapor barrier material overlaps or meets other surfaces. Ensure that the tape and caulk used to seal these areas are still intact and secure.
- Discoloration: Check for any discoloration on the vapor barrier, which could indicate moisture seepage or mold growth. Yellowing or dark spots are common signs of moisture problems.
Identifying areas with potential moisture accumulation:
- High-Humidity Zones: Inspect areas that are prone to high humidity, such as near showers, bathtubs, sinks, and windows. These zones are more susceptible to moisture buildup and require closer scrutiny.
- Corners and Crevices: Look at corners, behind fixtures, and other hard-to-reach areas where moisture might accumulate unnoticed. These spots can often harbor hidden moisture issues.
- Flooring and Baseboards: Check the flooring and baseboards around the bathroom for any signs of water damage or swelling, which can indicate moisture has penetrated the vapor barrier.
Cleaning the Surface
Maintaining a clean vapor barrier surface is essential for its effectiveness. Dust, debris, and other contaminants can compromise the barrier's integrity and lead to moisture issues if not regularly cleaned.
Removing dust and debris from the vapor barrier:
- Gentle Cleaning: Use a soft cloth or a duster to gently remove dust and debris from the vapor barrier surface. Avoid using abrasive materials that could scratch or damage the barrier.
- Regular Maintenance: Establish a routine cleaning schedule to keep the vapor barrier free from buildup. Monthly cleaning is typically sufficient, but areas with higher humidity might require more frequent attention.
Using appropriate cleaning agents for different materials:
- Plastic Sheeting: For plastic vapor barriers, use a mild detergent mixed with water to clean the surface. Apply the solution with a soft sponge or cloth, then rinse with clean water and dry with a towel.
- Foil-Backed Drywall: If your vapor barrier is foil-backed drywall, avoid using water-based cleaners that could damage the foil layer. Instead, use a dry cloth or a vacuum with a soft brush attachment to remove dust and debris.
- Vapor-Retardant Paint: For vapor barriers made of vapor-retardant paint, use a damp cloth with a mild cleaning solution suitable for painted surfaces. Gently wipe the area and dry it thoroughly to prevent moisture from penetrating the paint.
By performing regular visual inspections and cleaning the surface of your vapor barrier, you can ensure it remains effective in preventing moisture penetration. These routine maintenance tasks are simple yet essential for prolonging the life of your bathroom structures and maintaining a healthy indoor environment. Consistent care and attention to detail can prevent minor issues from becoming major problems, ensuring the longevity and functionality of your vapor barrier.
Step-by-Step Guide to Inspecting Your Vapor Barrier
Step 1: Gathering Necessary Tools
Before you begin inspecting your vapor barrier, it is essential to gather all the necessary tools. Having the right equipment will ensure a thorough and effective inspection.
Flashlight:
- Purpose: A flashlight helps illuminate dark areas and hard-to-see spots, ensuring you don't miss any potential issues during your inspection.
- Usage: Use a bright, focused beam to carefully examine the vapor barrier, especially in poorly lit areas like behind fixtures or in corners.
Moisture Meter:
- Purpose: A moisture meter measures the moisture content in materials, helping to identify areas where moisture may be penetrating the vapor barrier.
- Usage: Choose a moisture meter appropriate for the materials in your bathroom (e.g., wood, drywall). Follow the manufacturer's instructions for accurate readings.
Inspection Camera:
- Purpose: An inspection camera allows you to see into tight or hidden spaces that are difficult to access with the naked eye.
- Usage: Use the camera to inspect behind walls, under floors, and in other concealed areas. A camera with a flexible, extendable head is ideal for navigating around obstacles.
Repair Kit:
- Purpose: A repair kit contains materials and tools needed to fix minor issues found during the inspection.
- Contents: Typically includes patching materials, waterproof tape, caulk, and a caulk gun. Ensure your kit is equipped to handle various types of repairs.
Step 2: Conducting a Thorough Visual Inspection
A detailed visual inspection is the first step in assessing the condition of your vapor barrier. Here's how to conduct it effectively:
Inspecting seams and edges for gaps or tears:
- Seams and Edges: Carefully examine all seams where the vapor barrier material overlaps. Look for gaps, tears, or areas where the tape may be peeling away.
- Edges: Check the edges of the vapor barrier, particularly around windows, doors, and fixtures. Ensure the caulk or sealant is intact and there are no openings.
Checking for signs of mold or mildew:
- Visual Indicators: Look for discoloration, black spots, or a musty odor, which can indicate mold or mildew growth.
- Affected Areas: Pay close attention to areas prone to moisture, such as around plumbing fixtures, corners, and behind appliances.
Step 3: Using a Moisture Meter
After the visual inspection, use a moisture meter to measure the moisture levels in different areas of your bathroom. This step helps identify hidden moisture that may not be visible.
Measuring moisture levels in different areas:
- Varied Locations: Take moisture readings at various points along the vapor barrier, including walls, floors, and ceilings. Focus on areas near water sources and where you found potential issues during the visual inspection.
- Consistent Method: Ensure you follow a consistent method for each measurement to get accurate and comparable results.
Identifying areas with high moisture content:
- High Readings: Note any areas where the moisture meter indicates high levels of moisture. These areas are at greater risk for mold, mildew, and structural damage.
- Comparison: Compare readings across different sections to identify patterns or specific problem zones that require further attention.
Step 4: Employing an Inspection Camera
For a more in-depth examination, use an inspection camera to look into hard-to-reach areas and document your findings.
Examining hard-to-reach areas:
- Inaccessible Spots: Use the inspection camera to check behind walls, under floors, and in other confined spaces that are not easily visible.
- Detailed View: The camera provides a detailed view of these areas, allowing you to spot potential issues that may be missed during a visual inspection.
Documenting findings for further analysis:
- Recording: Record images or video footage of any issues you find. This documentation is valuable for further analysis and for sharing with professionals if needed.
- Detailed Notes: Take detailed notes on the location and nature of any problems. This information will help guide repairs and future inspections.
By following this step-by-step guide, you can thoroughly inspect your vapor barrier, identify potential issues, and take the necessary steps to maintain its effectiveness. Regular inspections and maintenance are key to protecting your bathroom from moisture damage and ensuring the longevity of your vapor barrier.
Identifying and Addressing Common Problems
Tears and Punctures
Common causes of damage:
- Accidental Impacts: Tools, fixtures, or furniture being moved around can accidentally puncture the vapor barrier.
- Wear and Tear: Over time, the vapor barrier can degrade due to constant exposure to moisture and temperature fluctuations, leading to small tears and punctures.
- Installation Errors: Improper handling or installation techniques can cause initial damage, which may worsen over time if not addressed promptly.
Steps to repair small tears and punctures:
- Clean the Area: Before repairing, clean the area around the tear or puncture to remove any dust or debris. This ensures better adhesion of the patch.
- Cut a Patch: Use a piece of vapor barrier material that matches the existing barrier. Cut a patch that is at least two inches larger than the tear or puncture on all sides.
- Apply the Patch: Place the patch over the damaged area and secure it with high-quality waterproof tape. Press firmly to ensure a tight bond, smoothing out any wrinkles or bubbles.
- Seal the Edges: Ensure the edges of the patch are well-sealed with additional tape or caulk to prevent moisture from entering.
Mold and Mildew Growth
Causes of mold and mildew:
- Excessive Moisture: High humidity levels, water leaks, or poor ventilation can create an environment conducive to mold and mildew growth.
- Inadequate Ventilation: Lack of proper airflow prevents moisture from dissipating, allowing mold and mildew to thrive.
- Poor Maintenance: Failure to regularly inspect and clean areas prone to moisture can lead to mold and mildew problems.
Cleaning and treating affected areas:
- Identify Affected Areas: Locate all areas where mold and mildew are present, including behind fixtures, in corners, and along edges.
- Use Protective Gear: Wear gloves, a mask, and goggles to protect yourself from mold spores during the cleaning process.
- Clean with Mold Remover: Apply a mold remover or a solution of bleach and water (1 cup bleach to 1 gallon of water) to the affected areas. Use a scrub brush to remove mold and mildew.
- Dry Thoroughly: After cleaning, dry the area thoroughly to prevent further mold growth. Use fans or dehumidifiers to speed up the drying process.
- Treat with Anti-Mold Products: Consider applying anti-mold products or paint to prevent future growth.
Loose or Unsealed Edges
Identifying unsealed edges:
- Visual Inspection: Conduct a thorough visual inspection of the vapor barrier, paying close attention to the edges where the barrier meets walls, floors, and ceilings.
- Check for Gaps: Look for any gaps, loose tape, or areas where the barrier is not securely fastened. These are potential entry points for moisture.
Properly resealing edges with appropriate materials:
- Clean the Edges: Ensure the edges are clean and dry before attempting to reseal them. Remove any loose debris or old adhesive.
- Apply Caulk or Sealant: Use a high-quality waterproof caulk or sealant to fill any gaps and seal the edges. Apply a continuous bead along the edge and smooth it with a caulking tool or your finger.
- Reinforce with Tape: For added security, apply high-quality waterproof tape over the sealed edges. Press firmly to ensure a tight bond and smooth out any wrinkles or bubbles.
- Inspect Regularly: Periodically check the sealed edges to ensure they remain intact and effective. Promptly address any new gaps or signs of wear.
By identifying and addressing common problems such as tears and punctures, mold and mildew growth, and loose or unsealed edges, you can maintain the effectiveness of your vapor barrier. Regular maintenance and timely repairs are essential to protect your bathroom structures from moisture-related damage and ensure a healthy indoor environment.
When to Repair or Replace Your Vapor Barrier
Assessing the Extent of Damage
Proper assessment of the vapor barrier is essential to determine whether a repair will suffice or if a complete replacement is necessary. Here’s how to evaluate the condition of your vapor barrier:
Determining when a repair is sufficient:
- Minor Tears and Punctures: Small tears or punctures that are localized and do not compromise large sections of the vapor barrier can usually be repaired effectively. These minor damages might occur due to accidental impacts or wear and tear over time.
- Localized Issues: If the damage is confined to a specific area and does not extend throughout the vapor barrier, a targeted repair approach can be both cost-effective and efficient.
Signs that indicate the need for replacement:
- Extensive Damage: Large areas of the vapor barrier that are torn, punctured, or degraded require replacement. When multiple sections are damaged or the material shows significant wear, the barrier’s integrity is compromised.
- Persistent Moisture Problems: Continuous or recurring moisture issues, such as mold or mildew growth behind the barrier, indicate that the barrier is no longer effective and needs to be replaced.
- Aging Material: Over time, vapor barriers can degrade due to environmental factors and material fatigue. If the barrier is old and brittle, it’s likely time for a full replacement to ensure continued protection.
Repair Techniques
When the damage to your vapor barrier is minor and localized, several repair techniques can restore its functionality:
Using patches for minor repairs:
- Clean the Area: Before applying a patch, clean the damaged area to remove any dust or debris, ensuring better adhesion.
- Cut and Apply the Patch: Cut a piece of vapor barrier material that is slightly larger than the damaged area. Secure it over the tear or puncture with high-quality waterproof tape, pressing firmly to ensure a tight seal. Smooth out any wrinkles or bubbles for an airtight repair.
Applying caulk or sealant for small gaps:
- Identify Gaps: Look for small gaps or holes, especially around seams and edges.
- Caulking Process: Use a caulk gun to apply a bead of high-quality waterproof caulk or sealant to the gaps. Smooth the caulk with a caulking tool or your finger to ensure it fills all gaps completely, providing an effective seal against moisture.
Replacement Guidelines
In cases where the vapor barrier is extensively damaged or degraded, replacing it is the best option to ensure effective moisture protection. Follow these steps for a proper replacement:
Steps for removing the old vapor barrier:
- Preparation: Clear the area of any obstructions and gather necessary tools such as a utility knife, pry bar, and protective gear.
- Careful Removal: Cut and remove the old vapor barrier material carefully to avoid damaging the underlying structure. Dispose of the old material properly, especially if it shows signs of mold or mildew.
Installing a new vapor barrier:
- Measure and Cut: Measure the area to be covered and cut the new vapor barrier material to the appropriate size, allowing for overlaps at seams and edges.
- Attach the Barrier: Start from the top of the wall or ceiling, attaching the new vapor barrier using a staple gun. Ensure the material is taut and smooth to avoid any wrinkles or air pockets.
- Seal the Seams and Edges: Overlap adjacent sheets by at least six inches and seal the seams with high-quality waterproof tape. Use caulk to seal around windows, doors, and any other penetrations to create a continuous moisture barrier.
- Final Inspection: Once installed, inspect the new vapor barrier for any potential gaps or issues, ensuring it is properly sealed and securely attached.
By carefully assessing the extent of damage and choosing the appropriate repair or replacement method, you can maintain the effectiveness of your vapor barrier and protect your bathroom structures from moisture-related issues. Regular inspection and timely maintenance are key to ensuring long-term durability and performance.
FAQs
Contact Crawl Logic Today!
Crawl Logic will do everything we can to ensure your experience with us is excellent.
Request A FREE Estimate
CHECKOUT RECENT POST

Schedule Your FREE Crawl Space Evaluation!
Did you know YOU DON'T HAVE TO BE HOME for us to provide you with your 100% FREE crawl space inspection and report?
CHOOSE THE BEST OPTION, CRAWL LOGIC!
Ready to Elevate Your Experience? Let's embark on a journey to success together! Our team is dedicated to delivering excellence and innovation tailored to your unique needs. Connect with us now to discover how our services can transform your vision into reality. Your next big leap starts here
Crawl Logic - Franklin Crawl Space Encapsulation and Repair
COMPANY INFO
Address: Franklin, Tennessee, United States
Email:
joshuamaynor1988@gmail.com
Phone: 615-257-9772
Office: 615-540-2278
HOURS
Monday: 8:00AM - 5:00PM
Tuesday: 8:00AM - 5:00PM
Wednesday: 8:00AM - 5:00PM
Thursday: 8:00AM - 5:00PM
Friday: 8:00AM - 5:00PM
Saturday: CLOSED
Sunday: CLOSED
Copyright © 2020 Crawl Logic - Franklin Crawl Space Encapsulation and Repair